When a Texan refers to barbecue, chances are they are not referring to pork. You may hear them use the term “cabrito”, but it is more than probable that you will be eating beef in this case. No siree, barbecue, in the eyes of a Texan, is synonymous with one thing – brisket.
However, due to the fact that the brisket is a muscle utilised for walking, which is pretty much all a cow does other than feed and burp, this is one of the roughest, leatheriest, and most difficult to cook portions of meat on the animal. However, when combined with the magic of slow cooking over an extended period of time, this piece of leather may be changed into a piece of meat that will leave you craving more and better for the rest of your life.
Let’s find out more.
When it comes to selecting a brisket, more than just talent is required. Since most briskets arrive at the butcher vacuum-sealed, determining what you’re getting might be a game of chance (around 80%). Because brisket isn’t widely available in some parts of North America, it required a significant amount of time and effort, as well as some begging and bribery, to locate a butcher who could provide me with briskets that weren’t pre-packaged.
Point and Flat
A brisket is fundamentally separated into two pieces, known as the point and the flat, with one side having very little fat on it and the other having a lot of fat on it. When this side is facing down, the flat is on the bottom and the point is pointing up, towards the high end of the brisket, with the flat facing down.
It is the most versatile piece of brisket because it can be used in both chopped and sliced applications. The point is more commonly used as a chopped brisket than the flat because it contains more connective tissue than the flat, and this connective tissue breaks down during the cooking process, making the point more likely to fall apart rather than slice.
The trouble with the two cuts is that when the grain runs perpendicular to one another in a full piece, it makes it impossible to slice the two slices together.
Although the two slices can occasionally be purchased individually, for barbecue, you want to obtain the entire brisket, in one complete piece, with a lovely one-quarter to one-third inch fat cap. “Packers Cut” and “deckle-off boneless” are terms used to describe this type of brisket in some circles. Due to the fact that the majority of butchers looked at me as if I had lost my mind when I stated “deckle,” your butcher is significantly more likely to be familiar with the term “Packers Cut.” Once the brisket has been cooked, you will separate the two pieces in order to remove the perpendicular grain from the meat.
While the fat cap plays an important role in keeping the meat wet, it is the marbling of the meat that is by far the most critical factor in generating a soft and moist brisket of beef.
You should choose a brisket that has thin and consistent streaks of marbling running through it throughout the meat.
You don’t want it all clumped together in one spot, nor do you want the marbling to be so thick that it crosses the line into being just plain fatty. If you use too much fat, you will wind up with a greasy mess; if you use too little, it will be as dry as a bone. When it comes to brisket, it’s all about finding the right balance.
Size Does Matter!
Following your discovery of a piece with excellent marbling, the next item you should consider is the size. A larger brisket necessitates significantly more effort to become tender than a tiny brisket – if it ever does become tender at all. The reason for this is that the larger brisket comes from a more mature cow, which results in a tougher end product. My favourite weight range is generally between 7 and 10 pounds, depending on the situation. The thickness of the cut should also be considered while determining the appropriate size. Generally speaking, briskets have a tendency to taper down into a thin end piece, but if at all feasible, try to get a brisket that is the same thickness throughout. This will help to ensure that your brisket cooks evenly throughout.
Another factor to consider when selecting a brisket is its ability to be carved into different shapes. If you place it in the centre of your hand, it should drape over your hand rather than remain firm. If it remains stiff, it is most likely an indication that it will be a challenging experience. Even though there are no assurances when it comes to brisket, it is generally believed that a softer piece of beef will yield a more tender product – think tenderloin.
Safety First
Finally, like with any cuisine, make certain that the meat is both visually appealing and safe. It should be firm, have a fresh beefy fragrance, and be a great deep red colour. It should also have been stored at the right temperature at all times, according to the manufacturer.
Brisket can be purchased and frozen for use at a later time; just be sure to take it out of the freezer a day or two ahead of time and place it in the refrigerator to defrost before cooking. An eight-pound brisket will defrost in your refrigerator between 24 and 36 hours, depending on the temperature of your refrigerator. Please keep in mind that failure to maintain adequate temperatures (between 34F and 39F) for the defrosting procedure can result in the brisket becoming spoiled or even becoming sick.
How To Cook Brisket
Remove the brisket from its packaging the day before you want to cook it and set it on your cutting board with the fat cap facing down. Starting at the flat using a sharp fillet or meat knife, proceed to remove the thick, yellowish fat that has formed. Working the thick strip of fat that divides the point and flat cuts next, remove the excess fat until there is just a thin layer of fat between the two cuts is left to finish the job. This layer also helps to keep your brisket moist, but if you don’t trim it, it will end up being overly greasy and fatty. Finally, take a look at the fat cap and make sure it is evenly thick throughout the brisket, cutting any thicker sections to match the rest of the brisket.
It has been my experience that it is nearly impossible to detect which way the grain runs once the meat has been cooked, so it is a good idea to cut a piece of flesh against the grain merely to identify which way the grain runs once the meat has been cooked.
‘Tis the Season(ing)
The seasoning of the brisket is my favourite part of the process. Once the meat has been trimmed, rinse it thoroughly under running water and pat it dry with paper towels before placing it on a piece of plastic wrap large enough to cover it (but not too much!).
Combine 1 cup mustard, 1/4 cup your preferred dry rub (I prefer Caroline’s Rub), and 1/8 cup ground horseradish in a small mixing bowl until it forms a paste. Apply the paste on the brisket with a brush, making sure to cover all of the meat completely. This paste will add a little zip to your bark, as well as help to prevent excessive moisture loss and hold the dry rub to the meat during grilling or smoking.
While some may argue that the vinegar in the mustard also aids in tenderising the meat, I believe this is only true to a very limited extent. While it does contribute to the tenderization of the meat’s very exterior, it has little effect on the tenderness of the meat beneath the surface of the meat. Another rationale for the importance of marbling can be found here.
Once the meat has been well covered, wrap it tightly in plastic wrap, making sure there are no air escapes or holes in the wrap. Place the dish in the refrigerator and leave it there overnight. When you’re ready to cook it, take the brisket out of the refrigerator, unwrap it, and allow it to come back to room temperature before placing it on your grill or smoker to finish cooking.
Something to keep in mind is that if you use a salty rub, you will increase the amount of moisture that is lost from the meat. The salt will leach moisture from the meat as a natural part of the osmotic process and as a result of the exceptionally long, slow cooking time. The difficulty this poses is that the moisture content of the meat is the best conductor of heat, which produces a dangerous situation. When heat is distributed uniformly throughout the meat, it is evident that the meat will be more evenly cooked – the important thing to remember is that the outside will not be charcoal by the time the inside is cooked. It is preferable if your rub does not contain a significant amount of salt, or if it does, you can cook the brisket on the grill or smoker immediately after seasoning with the rub and mustard paste, albeit at the loss of a little flavour.
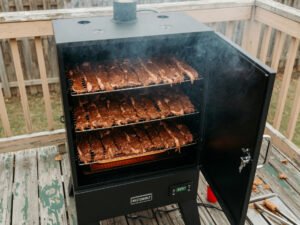
Into the Smoker!
With your brisket ready to go into the smoker, it is time to get the grill going. The type of wood you use to cook your brisket will have a significant impact on the flavour of the finished product. I have to admit that I am a sucker for a combination of pecan and cherry flavours. When compared to the hickory, the pecan is less noticeable, and the cherry contributes a sweetness that gives the whole flavour depth while also leaving tasters wondering what that extra something special was. Keep the emphasis off of creating an exceptionally deep “smoke ring” in the brisket. The ring of colour that runs around the exterior of the meat and fades to a faint pink as it progresses further into the meat is not actually a smoke ring at all. It is the result of a chemical reaction between the elements in meat. Because of the moisture in the meat, as opposed to smoke density, the depth of colour is more dependent on moisture. It has no effect on the flavour of the product and is not used as a judging factor in competitions either.
For barbeque, I’ve used a variety of smokers, including offsets, electric smokers, propane-fueled smokers, water smokers, and even the crock-pot, and there isn’t one that I particularly like. It is entirely dependent on my objective and, of course, how I want to smoke food. I’ll turn on the offset if I’m just want to have a lazy day and do nothing but rest. Whenever I find myself in a scenario where I can’t devote all of my time to it, I turn to the Cookshack SM050, which is almost straightforward to use. Both produce items that are equally delectable, with only slight variances between the two. The most important aspect of cooking the brisket is to keep the temperature equal and consistently low throughout the cooking process.
A temperature of no higher than 225F should be maintained during the cooking process, which equates to around an hour and a half per pound of meat. I usually cook my briskets at 215 degrees Fahrenheit, which adds a little time to the cooking process but allows for a small margin of error if the heat gets away from me for a split second. It is critical to remember that after I get the smoker stabilized at my ideal temperature, I do not want to lose all of my heat when I open the doors. Therefore, it is critical to have everything ready to go so that the doors are only open for as long as is necessary. When placing the brisket on the cooker, make sure it is as far away from the source of heat as possible to ensure that the meat cooks evenly and gently during the cooking process. Whenever you place your thermometer probe into the brisket, make sure to check it for doneness in the “flat” rather than the “point.” The ‘point’ will usually become tender before the “flat,” leading you to believe that the brisket is done. Continue to cook until the flat is soft, and then remove it from the heat.
Remember to Mop up!
While many people believe it should never be done, others believe that brisket is not truly brisket until it has been properly mopped. It appears to be dependent on the smoker. While it does impart some taste to the meat, a mop is more correctly described as a method of retaining moisture so that the meat does not dry out. Use of any type of mop may not be necessary if your smoker has a water bowl or if your smoker has a tendency to have naturally high moisture levels while in operation. Utilizing a mop will typically result in superior moisture protection when using an offset because of the significantly drier heat produced by the offset. However, keep in mind that every time you open the smoker, the temperature drops, and in certain smokers, the temperature plummets, increasing the amount of time it takes to cook your food. Set a firm plan for mopping and stick to it as much as possible. I usually mop the brisket no more than once every 2 – 3 hours, depending on the size of the brisket.
A remote thermometer, or at the absolute least a thermometer with a probe that attaches to a thermometer fixed to the outside of your smoker, is essential for knowing when your brisket is done (I recommend Polder and Maverick Thermometers). I actually use two thermometers: one to check the internal temperature of the meat, and another to monitor the internal temperature of the smoker, simply because the gauges that come with most smokers are extremely inaccurate.
Set aside a rack of brisket that has been sitting at room temperature with the fat cap facing up, and insert your meat probe into its thickest portion. This will allow the fluids to permeate and surround the meat, which will aid in basting the meat as the fat renders away from the flesh. If required, plug in your thermometer and leave the meat alone for at least 3 hours before cutting into it.
The reason I recommend waiting three hours is that it gives the crust enough time to form, which keeps the rub from sliding off or washing away if you choose to mop. Because sugar burns at 265 degrees Fahrenheit, and because you will rarely, if ever, surpass 240 degrees Fahrenheit, you won’t have to worry about burning the sugar, butter, or tomato-based rubs and mops you use on low and slow barbecue. After reaching an internal temperature of 185 degrees Fahrenheit, the majority of the fat has melted, allowing for the creation of a soft product that is ideal for slicing. If you want to get the chopped meat consistency, some pitmasters recommend taking the brisket out of the smoker at the 185-degree mark and wrapping it in aluminium foil, then returning it to the smoker until the brisket hits 195-degrees. This is due to the fact that at approximately 192F, the collagens that truly bond the beef and make it tough melt, resulting in a brisket that breaks apart and is more suitable for chopped brisket sandwiches than sliced brisket. Using aluminium foil to wrap the brisket will protect it from absorbing any further smoke, will keep it moist, and will prevent it from entirely breaking apart when the internal temperature reaches 192 degrees Fahrenheit, making it simpler to take from the smoker.
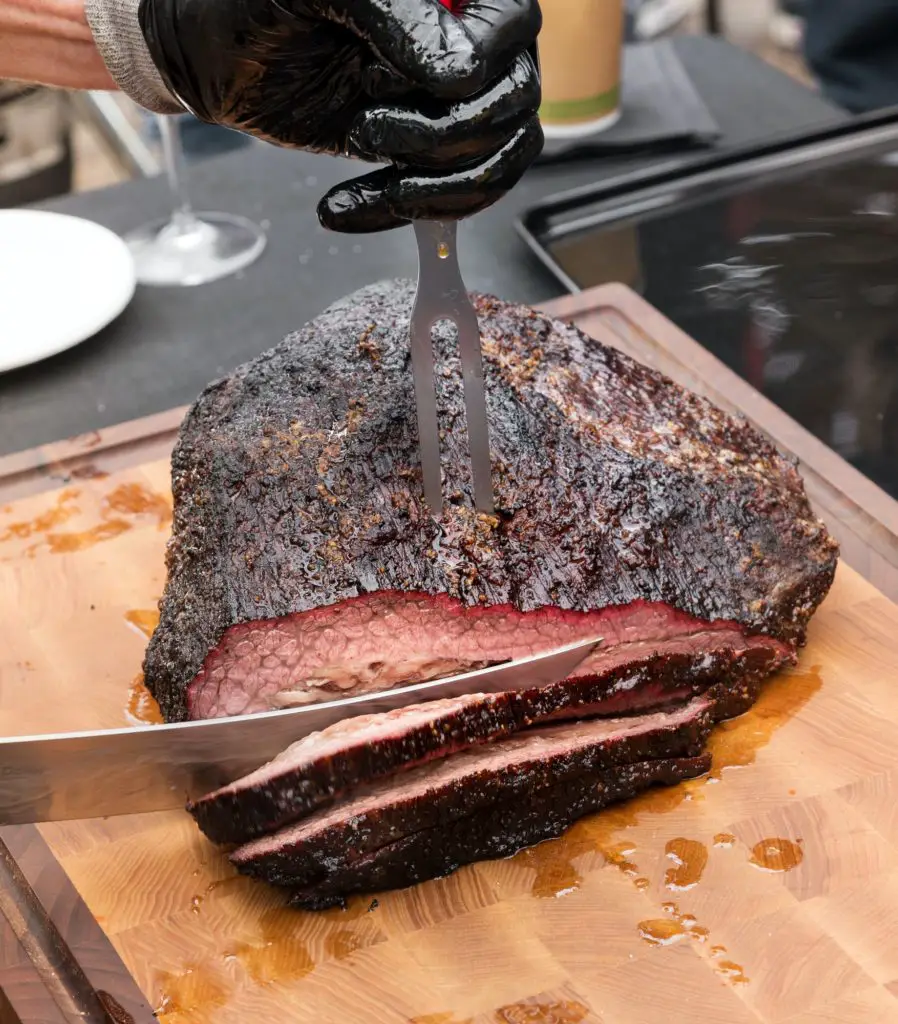
To slice the brisket, take it from the oven at 185 degrees Fahrenheit and set it on the cutting board with the fat cap facing down. Using this method, you will be able to locate the layer of fat that connects both the point and the flat and the point. It is necessary to separate the two muscles in order to eliminate the excess fat that runs between them and to prevent it from running into the muscles because their grains cross in opposite directions. However, the trade-off is that the point is typically fattier than the flat. The point is a tastier and significantly more tender piece of meat than the flat. It is possible to get a few good slices of a point from a larger cut of meat if your slow and low cooking has been successful in rendering the fat, and you started with a larger cut of meat. The point is the preferred choice for presentation at the competition if your cooking has been successful in rendering the fat.
Always cut the brisket into 14-inch thick slices by slicing it diagonally across the grain. When you hold the slice up and try to pull it apart, you should encounter some resistance before the slice comes apart. The brisket has gone beyond slicing and should be reserved for chopped meat applications such as sandwiches and baked potato toppings, rather than for slicing. Keep in mind that brisket dries out extremely rapidly once it has been chopped, so make sure you have everything ready before you begin cutting it. Use any fluids that remain after slicing the brisket to glaze the brisket before submitting it for judging. This will help to keep the moisture in the meat.