Get ready to take your chicken grilling game to the next level with this mouthwatering recipe for electric smoker beer can chicken. Like a symphony of flavors, this unique cooking method infuses your bird with the rich and smoky taste of an electric smoker, while also ensuring it stays moist and juicy thanks to the beer can.
In this article, we will guide you through every step of the process, from selecting the perfect type of chicken to carving and serving it like a pro. You’ll learn how to prepare the beer can, season the chicken, and properly preheat your electric smoker for optimal results. We’ll even share some tips and variations along the way to help you customize your dish.
But it doesn’t end there – we’ll also provide you with valuable information on cleaning and maintaining your electric smoker so that you can continue enjoying delicious beer can chicken for years to come.
So grab a cold one and get ready for a culinary adventure that will leave you craving more of this delectable electric smoker beer can chicken. Let’s fire up those smokers!
Choosing the Right Type of Chicken
Are you ready to find the perfect chicken for your electric smoker? Choosing the right type of chicken is crucial for achieving that juicy, flavorful beer can chicken.
Now let’s talk about the beer can alternatives. While using a beer can may be traditional, it’s not the only option for infusing flavor into your chicken. If you prefer not to use alcohol or simply want to try something different, consider using other liquids such as apple cider, broth, or even soda. These alternatives will still add moisture and flavor to your bird while keeping it tender and succulent.
When selecting a chicken for smoking, opt for one that is fresh and preferably organic. Look for plump breasts and firm skin – signs of a well-raised bird. It’s also important to choose a chicken that fits comfortably in your electric smoker without overcrowding.
By carefully selecting the right type of chicken and experimenting with different seasonings and beer can alternatives, you’ll be well on your way to creating mouthwatering beer can chicken in your electric smoker. So go ahead and get started on this delicious culinary adventure!
Preparing the Beer Can
Get going by grabbing a gleaming can and giving it a gentle twist. The first step in preparing the beer can for your electric smoker beer can chicken is to choose the right beer. This is an important decision as it’ll greatly impact the flavor of your chicken. Opt for a beer with a mild flavor that complements poultry, such as a light lager or pale ale.
Avoid using beers with strong flavors or high alcohol content, as they may overpower the taste of the chicken.
Now, let’s talk about alternatives to using a beer can. If you don’t have any beer on hand or prefer not to use it, there are other options available. One popular alternative is to use a soda can filled with water or broth instead. This adds moisture to the chicken while still creating steam for tenderizing and flavoring purposes.
Another option is to use a canister specifically designed for this purpose, which often comes with its own seasoning mix.
Choosing the right beer and preparing the beer can are crucial steps in achieving delicious electric smoker beer can chicken. Whether you decide to go with traditional beer or explore alternatives, make sure to consider your personal preferences and desired flavor profile when making your choice.
Seasoning the Chicken
Now it’s time to add some flavorful seasonings to your poultry masterpiece. Marinating techniques and different seasoning blends can take your beer can chicken to the next level of deliciousness.
Marinating is a great way to infuse your chicken with flavor and keep it moist during the cooking process. There are many marinating techniques you can try, such as using a simple mixture of olive oil, lemon juice, garlic, and herbs. This will give your chicken a tangy and herbaceous taste that pairs perfectly with the smoky flavors from the electric smoker.
When it comes to seasoning your bird, there are endless possibilities. From classic combinations like salt, pepper, and garlic powder to more adventurous flavors like Cajun or lemon herb, the choice is yours. Experiment with different seasonings to find your favorite.
If you want to experiment with different seasoning blends, there are endless possibilities. You could go for a classic barbecue rub, which usually consists of brown sugar, paprika, garlic powder, onion powder, salt, and pepper. This blend will give your chicken a sweet and savory profile that is sure to impress. Or you could try something more adventurous like a jerk seasoning blend with spices like cinnamon, nutmeg, allspice, thyme, and cayenne pepper for a spicy kick.
Regardless of the seasoning blend or marinating technique you choose, make sure to coat your chicken thoroughly before placing it on the beer can in the electric smoker. This will ensure that every bite is bursting with flavor and juiciness. So get creative with your seasonings and elevate your beer can chicken game!
Preheating the Electric Smoker
Preparing for the mouthwatering feast ahead, it’s essential to preheat your smoking device to ensure a tantalizing culinary experience. When it comes to electric smokers, preheating is a crucial step that shouldn’t be overlooked.
Properly preheating your smoker guarantees that you achieve the desired temperature and maintain optimal cooking conditions throughout the process.
To begin, there are various preheating techniques you can employ. One effective method is to set your electric smoker at the desired temperature and allow it to warm up for about 15-20 minutes before placing the chicken inside. This allows the internal components of the smoker, such as heating elements and thermostats, to reach their peak performance levels.
Temperature control is of utmost importance when smoking beer can chicken. Preheating ensures that your electric smoker reaches and maintains a consistent temperature throughout the cooking process. This is crucial because fluctuations in temperature can affect both the texture and flavor of your chicken.
By preheating your electric smoker properly, you not only guarantee uniform cooking but also enhance the smoky flavor infusion into every succulent bite. The heat generated during preheating creates an ideal environment for smoke production, resulting in that signature smoky taste we all crave.
Don’t underestimate the significance of preheating your electric smoker before embarking on your beer can chicken adventure. It sets the stage for culinary perfection by allowing you to control temperature precisely and achieve that mouthwatering result you desire. So make sure to follow proper preheating techniques for an unforgettable dining experience!
Setting Up the Wood Chips
Once the fire-breathing dragon of flavor has been awakened, it’s time to sprinkle in the magical wood chips that will transform your culinary creation into a smoky masterpiece. Soaking the wood chips is an essential step in maximizing their smoky potential. By soaking them in water for at least 30 minutes before adding them to the electric smoker, you ensure a slow and steady release of smoke throughout the cooking process. This not only enhances the flavor but also prevents the chips from burning too quickly.
When it comes to choosing the right type of wood chips, you have a wide variety of options to explore. Each type imparts its own unique flavor profile, giving you endless opportunities for experimentation and customization. Here’s a handy table detailing some popular wood chip options:
| Wood Chip | Flavor Profile |
|---|---|
| Apple | Sweet and fruity |
| Mesquite | Strong and earthy |
| Hickory | Rich and smoky |
| Cherry | Mild and slightly sweet |
| Pecan | Nutty with a hint of sweetness |
By mixing different types of wood chips or using them individually, you can create complex layers of flavors that will elevate your beer can chicken to new heights. Remember to add the soaked wood chips directly onto the electric smoker’s tray or box designated for smoking purposes. Now watch as these humble pieces of wood work their magic and infuse your chicken with irresistible smokiness.
Placing the Beer Can in the Chicken
To achieve the perfect balance of flavor, you’ll want to carefully position the can of beer inside the cavity of your juicy poultry. Placing a beer can in a chicken isn’t just a great way to infuse it with moisture and flavor, but it also adds an element of fun to your cooking experience.
However, if you’re looking for alternatives to beer cans, there are other options available as well. One alternative is using a soda can or even a small juice bottle. These options work just as well and still provide the necessary moisture and flavor infusion. If you decide to go with a soda can, consider choosing one that complements the flavors you’re aiming for. For instance, if you want a sweeter taste, opt for a citrus-flavored soda like lemon-lime or orange.
Another aspect to consider is the type of beer you use. Different beers have different flavors that’ll impact the overall taste of your chicken. Lighter beers like lagers or pilsners tend to impart a subtle and mellow flavor, while darker beers like stouts or porters add richness and depth. Experimenting with different beer flavors will allow you to discover new combinations that perfectly complement your chicken.
By carefully selecting your beer can alternative and experimenting with different beer flavors, you’ll be able to enhance the taste of your electric smoker beer can chicken and create an unforgettable culinary experience.
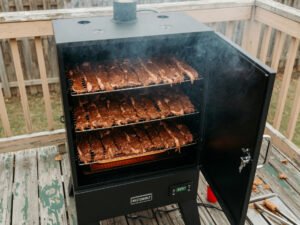
Positioning the Chicken in the Smoker
Before placing your poultry in the smoker, make sure to position it carefully for optimal cooking and flavor infusion.
The way you position the chicken can greatly affect how it cooks and absorbs the flavors from the beer can. Here are some positioning techniques and troubleshooting tips to help you achieve a delicious beer can chicken in your electric smoker:
Vertical Position: One popular method is to place the chicken vertically on top of the beer can. This allows for even heat distribution and ensures that the chicken cooks evenly from all sides.
Sturdy Base: Make sure that the base of the beer can is stable enough to support the weight of the chicken. A wobbly base may cause instability during cooking, leading to uneven results.
Centered Placement: Positioning the chicken centrally over the heat source ensures consistent cooking throughout.
-
Avoiding Contact: Ensure that no part of the chicken is touching any surface or wall inside the smoker. This helps prevent sticking or burning in certain areas.
-
Rotating Rack: If your electric smoker has a rotating rack feature, take advantage of it by periodically turning or rotating your chicken during smoking. This promotes even browning and flavor distribution.
By following these positioning techniques and troubleshooting tips, you’ll be well on your way to achieving a perfectly cooked beer can chicken with irresistible flavors infused throughout. Happy smoking!
Monitoring the Temperature
While keeping an eye on the temperature, it’s important to ensure that your bird is cooking to perfection. Temperature control is crucial in achieving a juicy and tender beer can chicken from your electric smoker. To monitor the temperature accurately, using a meat thermometer is highly recommended.
Investing in a quality meat thermometer will undoubtedly elevate your cooking game. With this tool, you can easily check if the internal temperature of the chicken has reached the desired level of doneness. Insert the probe into the thickest part of the meat without touching any bones for accurate readings.
To help you understand the ideal temperatures for different parts of the chicken, refer to this helpful table:
| Chicken Part | Minimum Internal Temperature (°F) |
|---|---|
| Breast | 165 |
| Thigh | 175 |
| Drumstick | 180 |
| Wing | 170 |
By following these guidelines and monitoring the temperature with precision, you can ensure that every bite of your beer can chicken is cooked to perfection. This attention to detail guarantees a moist and flavorful dish that will impress your family and friends. So grab your trusty meat thermometer and let it guide you towards culinary success!
Adding More Wood Chips
As you’re cooking, don’t forget to add more wood chips to infuse a rich, smoky flavor into your mouthwatering masterpiece. This step is crucial in maintaining the perfect balance of taste and aroma in your electric smoker beer can chicken. Soak your wood chips before adding them to prolong their burn time and enhance the intensity of the smoke they produce. You can choose from a variety of flavored wood chips like hickory, apple, or mesquite, depending on your preferences.
To ensure the wood chips are ready for use, soak them in water for at least 30 minutes before adding them to your smoker. This process prevents them from burning too quickly and allows for a slow release of smoke throughout the cooking process. The moistened wood chips will gradually smolder, creating an aromatic cloud that permeates every inch of your chicken.
When it’s time to replenish the wood chips, carefully open the smoker and place a handful onto the hot coals or into the designated chip tray. Remember to spread them out evenly to maintain an even distribution of smoke. As they ignite, watch as thin wisps of fragrant smoke rise and envelop your chicken with their tantalizing scent.
By consistently adding soaked wood chips throughout the cooking process and experimenting with different flavors, you’ll be able to achieve a delectable smoky taste that’ll have everyone coming back for seconds. So keep those flavorful embers burning and let the magic unfold!
Basting the Chicken
To achieve a succulent and flavorful result, embrace the art of basting your mouthwatering masterpiece with a delectable mixture of herbs, spices, and melted butter. Basting is an essential step in creating a perfectly cooked beer can chicken in an electric smoker. Not only does it enhance the taste by infusing the meat with rich flavors, but it also helps to keep the chicken moist throughout the cooking process.
There are various basting techniques and flavor variations that you can experiment with to elevate your beer can chicken game. One popular technique is to use a brush or marinade injector to apply the basting mixture evenly over the chicken. This ensures that every bite is bursting with deliciousness. You can also try different flavor combinations such as garlic and lemon or honey and thyme to add depth to your dish.
While basting is crucial for achieving incredible taste, it’s equally important to monitor the internal temperature of your chicken using a meat thermometer. This ensures that your bird is cooked to perfection, eliminating any risk of undercooked or overcooked meat. Insert the thermometer into the thickest part of the thigh without touching bone for accurate readings.
Mastering basting techniques and incorporating unique flavor variations will take your electric smoker beer can chicken from good to extraordinary. Don’t forget to rely on a trusty meat thermometer for accurate cooking times – this will guarantee tender, juicy meat that will have everyone coming back for seconds!
| Flavor Variation | Ingredients | Recommended Cooking Time |
|---|---|---|
| Garlic and Lemon | Fresh garlic, lemon | 1 hour per pound |
| Honey and Thyme | Honey, fresh thyme | 1 hour per pound |
| BBQ Glaze | Barbecue sauce | 1 hour per pound |
| Spicy Cajun | Cajun seasoning | 1 hour per pound |
Checking for Doneness
Ensure that your mouthwatering masterpiece is cooked to perfection by checking for doneness. After investing time and effort into preparing your beer can chicken in the electric smoker, it’s crucial to make sure it’s fully cooked before indulging in its flavorful goodness.
The best way to determine if your chicken is safe to eat and bursting with succulent tenderness is by using a meat thermometer. When checking for doneness, insert the meat thermometer into the thickest part of the chicken thigh or breast without touching bone. Make sure it reaches the deepest part of the meat but doesn’t come out on the other side.
The ideal internal temperature for cooked chicken is 165°F (74°C). If your thermometer reads below this temperature, continue cooking until it reaches this point. Using a meat thermometer eliminates any guesswork involved in determining whether your chicken is thoroughly cooked. It ensures that harmful bacteria are eradicated and guarantees a juicy, perfectly done bird every time you smoke one.
By relying on this simple tool, you can confidently serve up delicious and safe-to-eat beer can chicken that will impress your family and friends. So, remember to check for doneness using a meat thermometer when smoking your electric smoker beer can chicken. This step will ensure that you achieve optimal results and savor every bite of your flavorful creation with peace of mind.
Letting the Chicken Rest
After all the hard work you’ve put into creating your mouthwatering masterpiece, it’s absolutely crucial to let the chicken rest before diving into its succulent tenderness. Resting the chicken allows for optimal flavor development and juiciness. Here are three resting techniques that will take your beer can chicken to the next level:
- Tenting: Once you remove the chicken from the electric smoker, loosely cover it with aluminum foil. This tenting technique helps retain heat and moisture, allowing the juices to redistribute throughout the meat.
Time: Patience is key when it comes to letting your beer can chicken rest. Give it at least 10-15 minutes before carving into it. This short period allows for further cooking and equalization of temperatures within the bird.
Cutting Board Placement: Instead of placing the chicken directly on a plate or platter after removing it from the smoker, transfer it onto a cutting board with a juice groove. This way, any excess juices that escape during resting can be collected and used later for basting or making a flavorful sauce.
The benefits of resting go beyond enhancing taste and texture. Resting also allows proteins in the meat to relax, resulting in more tender bites. Additionally, it gives you time to prepare any sides or garnishes while ensuring that each bite of your electric smoker beer can chicken is packed with maximum flavor and succulence.
Carving and Serving the Chicken
Once the chicken’s rested, it’s time to expertly carve and serve the succulent masterpiece. Carving techniques are essential to ensure that each slice is perfectly cooked and retains its juiciness. Start by removing the beer can from the cavity, taking care not to spill any of the flavorful juices inside. Place the chicken on a cutting board with a well for collecting any drippings.
To begin carving, use a sharp chef’s knife or carving knife to carefully separate the legs from the body. Apply gentle pressure and follow along the natural joints to make clean cuts.
Next, remove each wing by slicing through where it meets the breast.
Now it’s time for the main event – slicing into those mouthwatering breasts! Cut thin slices perpendicular to the grain for maximum tenderness.
As you plate up your masterpiece, consider some serving suggestions that will complement this delicious dish. Serve alongside grilled vegetables or a fresh garden salad for a light and refreshing accompaniment. Another option is to pair it with creamy mashed potatoes and roasted garlic for a comforting meal. Don’t forget about sauces! Offer tangy barbecue sauce or zesty lemon aioli as condiments that’ll elevate every bite.
Remember, mastering these carving techniques and serving suggestions will take your electric smoker beer can chicken to new heights of culinary delight. So grab your knife and get ready to impress everyone at your next backyard gathering!
Tips and Variations
To truly elevate your culinary skills and create a memorable dish, try incorporating some creative tips and variations into your carving and serving techniques. Here are five ideas to help you take your electric smoker beer can chicken to the next level:
Experiment with different beer flavors: Instead of sticking to the classic beer can chicken recipe, why not try using different types of beer? From hoppy IPAs to rich stouts, each variety will add its own unique flavor profile to the chicken.
Adjust cooking time based on size: While the general rule of thumb for cooking beer can chicken in an electric smoker is 20 minutes per pound at 225°F, it’s important to remember that every bird is different. Use a meat thermometer to ensure that the internal temperature reaches 165°F for safe consumption.
Add spice rubs or marinades: Before placing the chicken on the smoker, consider marinating it overnight or applying a flavorful spice rub. This’ll infuse the meat with extra layers of taste and enhance its overall juiciness.
- Serve it with homemade sauces: Elevate your beer can chicken even further by serving it with delicious homemade sauces. Whether you prefer tangy barbecue sauce or creamy garlic aioli, these accompaniments complement the smoky flavors perfectly.
Get creative with presentation: Don’t be afraid to think outside of the box when it comes to carving and serving your beer can chicken. Consider shredding the meat for tacos or sandwiches, or present it whole on a platter garnished with fresh herbs for an impressive centerpiece.
By incorporating these tips and variations into your electric smoker beer can chicken preparation, you’ll create a dish that’s bursting with flavor and sure to impress everyone around your table.
How long should I let the chicken rest before carving and serving?
To achieve the juiciest beer can chicken, let it rest for about 10 minutes before carving and serving. This allows the flavorful juices to distribute evenly, resulting in a tender and moist meat.
Can I use a different type of wood chips for smoking the chicken?
Experiment with different types of wood chips for smoking chicken to enhance the flavor. Some popular options include apple, hickory, and mesquite. Each type offers unique characteristics, so consider the desired taste profile when choosing.
How often should I check the temperature of the smoker while cooking the chicken?
Check the temperature of your smoker every 30 minutes to ensure even cooking. This frequent checking allows you to make any necessary adjustments and prevents overcooking or undercooking. Resting the chicken before carving improves flavor and tenderness.
What is the ideal internal temperature for the chicken to ensure it’s fully cooked?
The ideal internal temperature for fully cooked chicken is 165°F. This ensures that all harmful bacteria are killed and the meat is safe to eat. Cooking time may vary depending on the size of the chicken.
Are there any alternative seasonings or rubs I can use for the beer can chicken?
You can enhance the flavor of your beer can chicken by using alternative seasonings and rubs. Experiment with different combinations like lemon pepper, garlic herb, or Cajun spice. Additionally, try using different wood chips for a unique smoky taste.
Conclusion
Congratulations! You’ve just mastered the art of cooking an electric smoker beer can chicken.
As you sink your teeth into the succulent, tender meat, the smoky aroma dances on your taste buds, taking you on a flavor-filled journey.
The golden skin crackles under your touch, revealing juicy and perfectly cooked meat within. With every bite, you savor the perfect balance of spices and the subtle infusion of flavors from the beer can.
Your guests will be left in awe as they savor this masterpiece of culinary delight. So go ahead, indulge in this mouthwatering experience, and become the grill master you were meant to be!